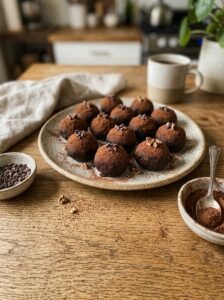
Did you know that over 70% of people on a low-carb diet say they miss chocolate the most? I totally get it! I’ve been there, staring into the fridge, desperately wanting a sweet treat that wouldn’t wreck my macros. That’s why I am obsessed with these keto chocolate cheesecake bites. They are creamy, rich, and absolutely decadent! Plus, they are so easy to make for anyone looking to enjoy low-carb desserts.

Gather Your Low-Carb Ingredients for the Ultimate Crust
I finally figured out the secret to making a base that doesn’t taste like cardboard, and I am so excited to share it with you! When you’re making keto chocolate cheesecake bites, the crust is literally the foundation of your whole dessert. I remember my first time trying to bake low-carb; I used coconut flour because it was on sale, and oh my goodness, it was like eating a dry sponge. It soaked up every bit of moisture and left my mouth feeling like I’d been wandering in a desert for days!
That is why almond flour is totally superior for that graham-cracker-like texture we all crave. It has a natural heartiness and a bit of oil that helps it crisp up just right in the oven. I always tell my friends to look for “super-fine” almond flour so you don’t end up with big chunks of nut in your teeth. It really makes these sugar-free treats feel like the real deal from a fancy bakery.
Choosing Your Sweetener Without the Weird Aftertaste
Picking a sweetener used to be so confusing for me when I first started my keto journey. I once bought a huge bag of pure erythritol, and while it looked like sugar, it had this weird “cooling” effect that made my mouth feel cold. It was super distracting when I just wanted to enjoy a rich dessert! Now, I always go for a monk fruit blend because it tastes much closer to the brown sugar my grandma used to use.
Monk fruit is way more concentrated, so the blends usually have a better balance that doesn’t leave that chemical aftertaste. A little bit goes a long way, especially since the chocolate filling is already so decadent. I usually just add about a tablespoon to the crust mix. If you’re like me and have a huge sweet tooth, you might be tempted to add more, but stay strong! The balance of the salty butter and the sweet monk fruit is what makes these snacks so addictive.
The Butter Ratio You Can’t Ignore
Let’s talk about the glue that holds everything together: melted butter. I made a huge mistake once by just “eyeballing” the butter, and my crust ended up being a greasy puddle. A specific ratio was discovered by me after many failed attempts in my kitchen. You really need exactly three tablespoons of melted butter for every one cup of almond flour to get it just right.
When you mix it, the dough should look like wet sand. If it’s too crumbly, your keto chocolate cheesecake bites will fall apart the second you try to take them out of the pan. I usually use salted butter because it makes the almond flavor pop, but unsalted works fine too if that’s all you have in the fridge. Just make sure you melt it slowly so it doesn’t splatter all over your microwave like mine did last Tuesday!
Getting the crust right is about half the battle, honestly. Once you have that perfect, buttery base pressed into your tin, you are well on your way to success. It’s a great way to handle those late-night cravings without feeling guilty the next morning. I always feel like a pro when I pull a perfectly golden crust out of the oven!

The Best Crust for Your Low Carb Chocolate Treats
Let me tell you, getting the crust right for these low carb desserts is totally a game changer. I used to think I could just mash up some regular graham crackers and call it a day. Boy, was I wrong! My first batch was a crumbly mess that fell apart the second I picked them up.
It was so frustrating because I spent good money on quality cream cheese. The secret I learned the hard way is using super fine almond flour instead of coconut flour. Coconut flour just absorbs way too much moisture. Almond flour gives you that classic, buttery bite that makes sugar free treats actually taste good.
The Butter Ratio Mistake
So, melted butter was poured directly into the dry almond flour by me on my second attempt. I didn’t measure it right, though. It was a greasy disaster that pooled in the bottom of my muffin tin. You need exactly three tablespoons of melted butter for every one cup of almond flour.
That specific ratio holds the base of your dessert together perfectly. If you use too much butter, they get soggy. If you use too little, you’ll be eating chocolate cream cheese off the floor after the crust crumbles. Trust me, I’ve been there and it is not a fun cleanup job.
Sweetening the Deal
Now, let’s chat about sweetener for a sec. I really prefer a monk fruit blend over plain erythritol for the crust. Erythritol sometimes leaves this weird cooling sensation in your mouth. You definitely don’t want that when you are trying to enjoy a rich, decadent snack!
Just a tablespoon of monk fruit sweetener mixed into the almond flour is plenty. It balances out the savory butter and makes the whole thing taste like a real bakery treat. Plus, my teenage kids totally crush these without realizing they are eating healthy fat bombs.
Pressing it Down Right
Here is a pro tip from my kitchen to yours. Don’t use your fingers to press the crust into your mini muffin pan. The warmth from your hands melts the butter too fast. A shot glass was used by me last time to tamp down the crust, and it worked beautifully!
Just press the bottom of the glass into the dough. It packs it down super tight and even. Baking the crust for exactly eight minutes at 350 degrees gives it that perfect golden edge.
Don’t Skip the Cooling Time
Here is another huge mistake I made early on. I poured the filling right onto the hot crust. The cream cheese melted everywhere! You have to let that almond flour base cool completely.
I usually stick my tin in the fridge for about fifteen minutes while I mix up the batter. Getting these steps right makes all the difference for the ultimate keto chocolate cheesecake bites you will ever eat. I promise your tastebuds will do a happy dance!
Sometimes I even sprinkle a tiny pinch of sea salt on top of the crust before baking. It sounds crazy, but salt brings out the chocolate flavor later on. Baking is just a big science experiment anyway, right? So don’t be afraid to try that salt trick next time you are prepping snacks for the week.

Bake and Chill Your Mini Chocolate Cheesecakes to Perfection
So, you finally got your batter smooth and ready. Baking your keto chocolate cheesecake bites can be super tricky if you don’t use the right pan. I tried using regular paper liners in a metal tin once, and it was a complete disaster!
Half the dessert stuck to the paper, and I was so mad I almost cried. Silicone muffin liners were eventually bought by me, and they changed my whole baking life. Seriously, you just pop the little treats right out when they are done.
A flexible mini muffin pan works great too. Just make sure you lightly grease them with a tiny bit of coconut oil first. This makes removing your sugar free treats totally stress-free.
Nailing the Bake Time
My biggest mistake early on was overbaking. I left my first batch in the oven for way too long because the centers looked jiggly. Turns out, keto baking is a bit different than regular stuff.
You actually want the center to have a slight wobble when you take them out. Bake them at exactly 325 degrees Fahrenheit for 12 to 14 minutes. I usually set a timer for 12 minutes and then watch them like a hawk.
The edges should look set and a tiny bit puffed up. If they start cracking, you left them in too long! Don’t panic if they seem underdone in the middle.
They will firm up a lot as they cool down. Getting this timing right is how you get that perfect, fudgy texture. Your friends won’t even believe these are healthy fat bombs!
The Hardest Part is Waiting
Now for the most frustrating step. You have to let them cool on the counter for a full hour. I know, it stinks to wait when the kitchen smells like delicious chocolate.
I ruined a whole tray of mini cheesecakes by trying to eat one hot. It just fell apart in my hands into a gooey mess. After they cool on the counter, put them in the fridge.
They need to chill for at least three hours before you touch them. Honestly, leaving your keto chocolate cheesecake bites in the fridge overnight is the best way. The flavors get so much richer and deeper the next day.
I always hide them in the back of the fridge so my kids don’t eat them all. These low carb desserts are just too good to share sometimes! Plus, they stay fresh in an airtight container for up to five days.
Skip the Complicated Steps
Some fancy recipes tell you to use a water bath for cheesecakes. Honestly, who has time for that mess? I spilled boiling water all over my oven door trying that nonsense last year.
It was super scary and totally not worth the effort. For these mini treats, the silicone pan does the job just fine. You don’t need the extra moisture because the bake time is so short.
Here is another trick I teach all my friends who do meal prep. These treats freeze incredibly well! Once they are completely chilled from the fridge, I toss them in a ziplock freezer bag.
They will keep in the freezer for up to three months without getting weird. When I want a sweet treat after grading papers, I just pull one out. You can let it thaw on the counter for ten minutes.
Or, if you are impatient like me, just eat it frozen like an ice cream bite. It is seriously the best way to handle a sudden craving.

Well, we finally made it to the best part of the whole process. Eating the results! Making these keto chocolate cheesecake bites is totally worth the little bit of effort it takes.
I remember being so scared of baking sugar free treats at first. My early attempts were completely awful and went right in the trash. But we talked about getting that perfect almond flour crust today, which fixes everything.
Then we mixed up a super smooth chocolate cream cheese filling together. Finally, we learned why chilling your dessert in the fridge is super important. Waiting is hard, but it makes the flavor so much better.
I took a big batch of these to the teachers’ lounge last Friday. My coworkers devoured them in like ten minutes flat. Nobody even guessed they were actually eating healthy fat bombs!
Having keto chocolate cheesecake bites ready to go keeps me on track. I don’t grab stale candy from the school vending machine anymore. My afternoons are so much better without that crazy sugar crash at 3 PM.
You can easily store your low carb desserts in a tight glass container. Just put a dry piece of paper towel in there to catch any extra moisture. They stay super fresh for your lunchbox all week long.
Sometimes I even make a massive double batch on Sunday mornings. A ton of keto chocolate cheesecake bites gets frozen by me for later. It is a super smart move if you have a crazy busy schedule like I do.
Don’t get mad if your very first batch isn’t absolutely picture perfect. My first try literally looked like weird little brown rocks. But they still tasted good, and I got way better at baking them over time.
The real trick is just following the steps and being super patient. Soon you will be a total pro at making keto chocolate cheesecake bites. Your family will probably beg you to make them for every single holiday.
I really hope you loved this simple recipe as much as I do. Please pin it to your favorite keto dessert board on Pinterest right now! Sharing my recipes helps my little blog out a ton.
Sharing ideas with friends is honestly the best way to stay motivated. Low carb baking used to be so frustrating for me years ago. Now it is my absolute favorite way to relax after grading fifty spelling tests.
You really can have your cake and eat it too. Just swap out the junk for good almond flour and monk fruit sweetener. These keto chocolate cheesecake bites are seriously the best things ever.
If you try making these, leave a comment below. I really want to hear about any funny mistakes you made in your kitchen! We can all learn a lot from each other’s baking disasters.
Just remember to let your cream cheese soften on the counter first. That was my absolute biggest lesson learned the hard way. Nobody wants to eat a lumpy, weird dessert, right?
Thanks for hanging out in my kitchen and reading my ramblings today. Keep experimenting with your own sugar free chocolate recipes at home. I will see you guys next week with another really fun treat!