Stop scrolling. Seriously, you need to see this. You know that feeling when you’re desperate for something rich, chocolatey, and decadent, but you’re terrified of getting kicked out of ketosis? We’ve all been there! I used to stare at bakery windows like a lost puppy until I realized I could make something better at home.
Did you know that 80% of people abandon their diets because they feel deprived of their favorite treats? That stops today. This isn’t just another dry almond flour experiment; this is a rich, molten, “how is this healthy?” dessert. In this article, we’re going to master the art of the sugar-free molten lava cake, ensuring you get that perfect oozing center every single time. Let’s bake!
 1")
The Magic Science Behind the Molten Center
I have to be honest with you—my first attempt at a Keto chocolate lava cake was an absolute disaster. It wasn’t molten, it wasn’t gooey, and it definitely didn’t flow like a river of chocolate when I cut into it. It was basically a sad, dry brownie that mocked me from the plate. I remember sitting at my kitchen counter, fork in hand, wondering why the heck my “lava” had turned into a rock.
It turns out, I was treating it like a normal cake. Big mistake!
The secret isn’t actually magic; it’s just a little bit of science that I learned the hard way. When you are dealing with sugar-free baking, the rules change a bit. Sugar usually provides structure and crunch, but since we are skipping the sugar, we have to rely on heat and fat to do the heavy lifting.
It’s All About the Heat Shock
Here is the deal. Most cakes bake nice and slow at 350°F (175°C). That allows the heat to gently travel to the center so the whole thing cooks evenly.
But for a Keto chocolate lava cake, we want the exact opposite. We want the outside to cook fast—like, really fast—while the inside stays raw and liquid.
I found that cranking the oven up to 425°F (220°C) is the sweet spot. You are essentially “shocking” the batter. The high heat sets the edges and forms a crust in minutes, trapping the liquid batter inside before it has a chance to turn into cake. If your oven runs cool, you are going to end up with a solid center every time. Trust me, I have ruined enough batches to know. Get an oven thermometer if you aren’t sure.
The Egg Factor
Another thing that tripped me up was the eggs. In regular baking, eggs add stability. But in low carb desserts, especially this one, eggs act as our thickener and our “lava.”
If you use just whole eggs, the center tends to set too firmly. The trick I discovered is to use an extra egg yolk or two. The yolks add that rich, custard-like texture that mimics the gooey mouthfeel of a traditional molten cake. It’s what makes the center spill out rather than just looking like undercooked batter.
Don’t Skimp on the Ramekins
You might think you can just throw this batter into a muffin tin and call it a day. Please don’t do that. Metal pans heat up way too fast and cook the batter all the way through before you can blink.
You really need ceramic ramekins for this. Ceramic conducts heat more slowly than metal. This buys you a little insurance policy. It keeps the batter insulated just enough that the edges bake, but the heat doesn’t rush to the middle too quickly. Plus, flipping a Keto chocolate lava cake out of a ceramic dish is way easier than prying it out of a muffin tin.
So, don’t be like me and bake a hockey puck. Respect the high heat, love the egg yolks, and use the right dish. Once you get this science down, you are golden.
 2")
Essential Ingredients for Low-Carb Success
Okay, let’s talk groceries. You can’t just swap things willy-nilly in this recipe and expect it to work. I learned that the hard way when I tried to use stevia drops and ended up with a bitter mess that my dog wouldn’t even eat.
To get that restaurant-quality Keto chocolate lava cake, you have to be picky with your ingredients. Here is what I keep in my pantry.
The Chocolate Choice
This is the most important part. Please do not use unsweetened cocoa powder as your main chocolate source here. It makes the cake taste dusty and dry. You need actual fat in the chocolate to get that melt.
I always use sugar-free chocolate chips or a high-quality dark chocolate bar (like 85% or 90% cocoa). Brands like Lily’s or ChocZero are my go-to’s because they melt smoothly. If you use a regular dark chocolate bar, just chop it up really fine so it melts evenly with the butter.
Flour Power: Almond vs. Coconut
I get asked this all the time: “Can I use coconut flour?”
My answer is usually, “Only if you like eating sand.”
Okay, that’s a bit mean, but for a lava cake, coconut flour is too thirsty. It soaks up all the liquid, and you lose that gooey center we are fighting for. You really want super-fine almond flour for this. It has a higher fat content and keeps things moist. If you only have almond meal (the stuff with the skins), it will work, but the texture will be a bit gritty.
The Sweetener Situation
Sugar substitutes can be tricky. Some of them leave a weird cooling sensation in your mouth, almost like mint. I hate that.
For this recipe, I prefer powdered erythritol or a monk fruit blend. Why powdered? because the granular stuff doesn’t always dissolve all the way in the short baking time, and nobody wants a crunchy cake. If you only have granular, just blitz it in a blender for a few seconds until it looks like dust.
Also, Allulose is fantastic if you can find it. It caramelizes and melts way better than erythritol, making the center even gooier.
Fats: Butter is Best
I’m a butter fan. Grass-fed butter gives it that rich, salty-sweet flavor that makes you forget you are on a diet. It helps the sugar-free molten lava cake slide right out of the ramekin.
If you are dairy-free, yes, you can use coconut oil. It works fine, but just know your cake is going to taste like a tropical vacation. That’s not a bad thing, but it definitely changes the vibe. Just make sure whatever fat you use is melted hot enough to melt the chocolate chips when you mix them.
 3")
Step-by-Step Baking Instructions
Okay, time to actually bake this thing. Don’t worry, it’s not rocket science. It’s actually faster than waiting for a pizza delivery. The whole process takes about 20 minutes from “I want cake” to “I am eating cake.”
1. Prep Like a Pro
First things first, turn your oven on to 425°F (220°C). Do not wait. It needs to be screaming hot when the batter goes in.
While that is heating up, grab two ramekins. This recipe usually makes two, so it’s perfect for date night or for eating one now and one for breakfast (I won’t judge). Rub the inside of those ramekins with butter. Be generous! Then, dust them with a little almond flour or cocoa powder and tap out the excess. This little barrier is what stops the cake from sticking. If you skip this, you will be eating cake out of the dish with a spoon—which is fine, but not as fancy.
2. The Melting Method
Grab a medium microwave-safe bowl. Toss in your sugar-free chocolate chips and your butter.
Microwave it for 30 seconds. Take it out and give it a stir. It will probably still look chunky. Put it back in for another 30 seconds. Stir again. Keep doing this in short bursts until it is completely smooth and glossy.
Warning: If you nuke it for 2 minutes straight, you will burn the chocolate. Burnt chocolate tastes terrible and there is no saving it. Patience is key here.
3. Mixing Without Messing Up
Once your chocolate mixture is smooth, whisk in your sweetener and a splash of vanilla extract. It might look a little grainy, but that’s okay.
Now, add the egg and the extra yolk. Whisk it well. You want to see the batter turn shiny and slightly thick. Finally, fold in the almond flour and a pinch of salt. Don’t go crazy here—just mix until you don’t see any dry flour streaks. We aren’t trying to build muscles; we are just making batter.
4. The Bake Time Game
Pour the batter into your prepared ramekins. Place them on a baking sheet (this makes it easier to pull them out).
Pop them into the oven. Set a timer for 8 minutes.
Here is the stressful part: You have to watch them. At 8 minutes, check the cakes. The edges should look firm and cooked, but the center should still look a little jiggly and soft, kind of like Jell-O. If it looks totally liquid, give it another minute. If it looks solid, pull it out immediately! Usually, 9 to 10 minutes is my perfect window, but every oven is different.
Once they are out, let them sit on the counter for about 2 minutes. This lets them finish setting up just enough so they don’t fall apart when you flip them. Then, run a knife around the edge, put a plate on top, and flip. Cross your fingers, lift the ramekin, and behold the lava!
 4")
Troubleshooting: Why Didn’t My Cake Lava?
I have cried over cake before. It sounds silly, but when you are craving that melty chocolate goodness and you cut into it only to find a solid, dry sponge… it is heartbreaking. I felt like I wasted my expensive almond flour.
If your first attempt at a Keto chocolate lava cake didn’t turn out perfect, don’t beat yourself up. It happens to the best of us. Here are the usual suspects for why the lava didn’t flow.
You Bliked (Overbaking)
This is the number one reason cakes fail. These little guys are sensitive. I mean, really sensitive. If you leave them in the oven for just 60 seconds too long, the center sets.
Next time, trust the jiggle. When you shake the pan gently, the middle should move. It shouldn’t look like raw soup, but it should wobble like gelatin. If it doesn’t move at all, you made a brownie. It’s still tasty, but it’s not lava.
Your Oven is Lying to You
I hate to break it to you, but the dial on your oven is probably wrong. My oven beeps to say it is ready, but my hanging thermometer says it is 20 degrees cooler.
If your oven isn’t hot enough (remember, we need 425°F or 220°C), the cake bakes slowly. This means the heat creeps into the center before the outside crust forms. The result? A cooked-through cake. Get a cheap oven thermometer. It saves so much heartache.
The Ingredients Were Too Cold
This is a sneaky one. If you pull your eggs and butter straight from the fridge and mix them up, your batter is going to be cold.
Cold batter takes longer to heat up in the oven. By the time the center gets warm enough to be safe to eat, the outside is burnt or overcooked. I try to set my eggs out on the counter about an hour before I bake. If you forget (I always do), just put the eggs in a bowl of warm water for 5 minutes. Works like a charm.
You Waited Too Long to Eat
I know you want to let it cool so you don’t burn your tongue, but you have to move fast. The ceramic ramekin holds heat really well. Even after you take it out of the oven, that heat is still cooking your cake.
If you leave the cake in the ramekin for 10 minutes while you chat or make coffee, it will keep cooking until it is solid. Let it rest for 2 minutes max, then flip it out onto a plate. The lava waits for no one!
 5")
Serving Suggestions and Toppings
So, you successfully flipped the cake and it didn’t explode. High five! Now, you could just eat it plain right off the plate. I have definitely done that standing over the stove. But if you want to feel like you are at a fancy restaurant, you got to dress it up a bit.
This cake is super rich. Like, really intense chocolate. You need something to balance that out so your taste buds don’t get overwhelmed. Here is how I serve mine.
The Hot and Cold Combo
There is nothing better than hot cake and cold ice cream. The contrast is just awesome. Since we are doing this low carb, grab a pint of Keto-friendly vanilla ice cream (Rebel or Halo Top usually works).
Put a scoop right on top of the hot cake. As it melts, it creates this creamy vanilla sauce that mixes with the chocolate lava. It is messy, but it is the best kind of messy.
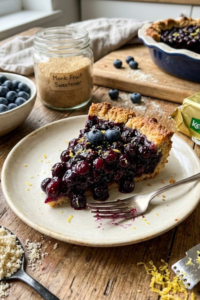
Add Some Tartness
If ice cream isn’t your thing, go for fresh berries. Raspberries are my absolute favorite here. The cake is heavy and sweet, and the raspberries are tart and acidic. They cut right through the richness.
It stops you from feeling “blah” after eating a heavy dessert. Plus, the red berries look really pretty against the dark chocolate. Strawberry slices work too, but blueberries don’t really have the same punch.
The “Fancy Pants” Finish
If I am making this for guests and want to show off, I do two simple things.
First, I take a little tea strainer and put some powdered sweetener in it. I gently shake it over the cakes right before serving. It looks like snow. It hides any little cracks or imperfections on the top of the cake, too.
Second, I add a dollop of unsweetened whipped cream on the side. You can whip up heavy cream yourself with a splash of vanilla, or just buy the spray can version (just check the label for sugar!).
Finally, if you miss crunch, chop up a few toasted pecans or walnuts. The cake is soft, the center is gooey, so having a little crunch from the nuts makes the texture way more interesting.
 6")
Mastering this Keto chocolate lava cake has honestly been a total game-changer for my low-carb lifestyle. I used to think I had to just suffer through birthdays and holidays while everyone else ate the good stuff. But now, I know I don’t have to choose between my health goals and my deep, undying love for chocolate.
It might take a couple of tries to get the timing exactly right for your specific oven, but don’t give up. Remember, the secret is really just watching that clock like a hawk! Once you get that perfect gooey center, you will never look back.
If you loved this recipe and it saved you from a late-night sugar craving, please don’t keep it to yourself! Pin this recipe to your Keto Desserts board on Pinterest so you can find it next time you need a chocolate fix. Trust me, your future self will thank you. Happy baking!